Friday, March 30, 2012

Weekly Inspiration: Hot Pink

Happy Friday Everyone! Did anyone go crazy over Mega Millions frenzy? Being a record $640 million, I got suckered in. For the record, I'm not yet a millionaire. On a brighter note, I was inspired by a certain color this week. I'm not much of a girly-girl but while browsing the web and looking through various sites hot pink was calling my name. I've never been a big fan of pink of any shade, but hot pink has to be my favorite of them all. Seeing how it's Spring, bright colors are in season. I say the brighter the better and I'm not one for bright colors. I usually only utilize colors in designs, but as I'm getting older I realized colors are for more than just designs. They can be used in your daily wardrobe to make an outfit more whimsical. They can be used in furniture to illuminate your living space. Color is everywhere. Be bold and pick one or two or ten. Integrate them into your daily life and you'll be a happier, more vibrant you! 


Thursday, March 29, 2012

DIY Glass Vase Decoration

Hello DIY Thursday! I love the idea of taking items you wouldn't necessarily use to create something innovative. It's not only recycling, but a new way to look at typical household items. I'm not afraid to admit I'm kind of a hoarder like most designers. Everything will have a use later on down the line. I might need an old glass bottle to use in a DIY...and today is that day. Glass bottles are easy to buy or find. You can reuse glass bottles from beverages or sauces. They can easily be used as beautiful flower vases by simply decorating them.

Tools you will need:
Bottle
Masking Tape
Scissors
Measuring Tape (optional)


So this is a simple process that doesn't take much more than patience and a steady hand. For me, wrapping anything dimensional is always difficult. The paper or tape never seem to wrap around nicely without bulging. The key to avoiding this is having a bottle that's not too extravagant in its contour. The flatter the surface, the better the tape will lay.

What you want to do is grab your bottle and measure it's diameter. Add a quarter inch and cut the masking tape to length. Make sure the ends are cut evenly. If you're feeling daring, you can do this without measuring. Tape the bottle from bottom to top evenly or to your heart's desire. Mix and match masking tapes for a bolder look. This can be a fast and easy way to create table toppers for everyday use or festive parties. So from now on rethink what you throw out. They might be useful in the future!

Wednesday, March 28, 2012

Can't live without twine

Sorry for being absent the last couple days. I'm in NJ and internet access has been limited. Anyways, I don't think it's any surprise that I love twine and honestly, I probably couldn't live without it. It's my best friend when it comes to gift wrapping and decorations. Along with being easy to find in various colors, it's versatile in it's use and look. You can use twine for anything from simple ties to tablecloths..no joke. Who would have thought something as straightforward as twine being made of simply string can be elegant and charming.

photo via FiftyFlowers.com


But it can and since it's Spring, flowers are in full bloom. Why not pick up a new hobby and start gardening? You can become your own florist. Flowers are easy to grow and just as easy to look at. Throw on some twine to balance out the beauty of the flowers with the roughness of the twine. When put together, they create a more ornate composite. It brings a sense of peace to the overall design.

photo via STYLE UNVEILED


If you're familiar with this blog, you'll know how much I utilize twine in wrapping. They can wrap anything from boxes to bags. Using twine as opposed to a more polished ribbon is a choice. It all depends on the look and meaning. When I think ribbon, I automatically think cheap birthday and party strings. This is the main reason I try to stay away from them. When I think twine, I think of beach and relaxation. When used with something related to weddings, it sets a different tone as opposed to ribbons. It all depends on what you're feeling and the mood you want to create.

photo via POCKETFUL OF DREAMS


Twine can be a great accent for embellishing and decorating. They can easily turn any boring light fixure into a something a lot prettier. Twine ball light garlands aren't that difficult to make, but do take quite a bit of time and patience. But the results are well worth it, especially when used with various shades and tones of the same twine. Combine this with the shadows from the light and your walls will be a majestic palace.

photo via shelterness


Even though twine is just string, it's strong and durable enough to withstand a little weight. I love hanging pictures on my wall but don't like damaging my walls with screws. I currently tape my pictures up, but it's static and dull. When using twine as something similar to a clothesline, it can add dimension and movement to enhance the feeling of your space. 

photo via Z GALLERIE


Twine can be used to create anything, including table decor. As seen above, using a twine table piece can brighten up a rather dull and colorless table. Seems weird how a colorless twine can add color to an object. For me, the twine creates a texture that contrasts the table's texture. This automatically draws attention to itself, thus resulting in a defined focal point, thus creating "color."

photo via grey likes weddings


Using twines of various colors can be handy when creating something more refined. Color coordination is key to making your packages stand out and come alive. It makes it look like you're thinking about what you are doing rather than just throwing something together. So pick up some twine in as many colors possible and stash them away. You'll never know when they may come in handy!

Sunday, March 25, 2012

Banana Pops

While sitting here eating cookie dough ice cream, I happened to stumble upon these banana pops from Bakers Royale's blog. I'm not a big fan of bananas but the layouts of all the sweets caught my eye. I love anything with toppings. These banana pops were both visually appealing and charming. It's a fun and simple idea that can easily jazz up your party. I mean, who doesn't love creating sweets to their own liking? It's like a personal buffet right at your fingertips. And it's on a stick! Having this at your party will make it seem like you went that extra mile to create an enjoyable atmosphere.


photo via BAKERS ROYALE

Imagine all the combinations you could create with these. It's an endless array of flavors and textures that could send anyone to heaven. You could add anything you'd like. The above photo is no limitation. You could even coordinate different toppings to suit different occasions such as themes and colors.


photo via BAKERS ROYALE

The key to these banana pops are marshmallows. They'll not only keep the banana from sliding down the skewer, they're also tasty. So at your next special event, keep these in mind. You'll surely be the host everyone will want to go back to!

Friday, March 23, 2012

Rainbow Cake=Childhood Dream!

I don't need to tell you about my love for cake seeing how I love to eat, especially sweets. Kaitlin Flannery over at Whisk Kid blog made my childhood dream come true with her rendition of a colorful rainbow cake. This made the kid in me giddy with joy. Each layer is baked individually then stacked on top of one another. It's a time consuming process, but as you can see, the results are well worth it. As a kid I was a big fan of anything that entailed the colors of the rainbow. It was a reminder of crayons, colored pencils, and markers. These were pretty much my favorite tools back in the day. My favorite part about this cake is what's unforeseen. Like anything well-designed, the surprise factor is key to making things memorable and desirable. Imagine cutting into what seems like an all white cake and then abruptly seeing rainbow. This brings a whimsical element that can brighten any occasion!

photo via Whisk Kid


You can find the complete recipe here, and below is a time-lapse process video.

Thursday, March 22, 2012

DIY Thursday! Doily Packaging

I promised you two gift wrapping ideas today and I'm a woman of my word. But I wanted to let you know for the next few weeks Thursdays will be DIY Thursdays! So mark your calendars for some of the exciting new tutorials to come. Today we are bringing back the charming doily and utilizing them in something other than housing and accessories.

The tools you will need:
Doily
Double-sided tape
Craft wrapping paper
Tag
Scissor
Twine


STEP 1:
Wrap the gift with craft paper the way you would normally any gift. Place the doily on desired area on top of the package.


STEP 2:
Take the twine and wrap it around the package a couple times around leaving about 6-8 inches. Tie a knot in the center.


STEP 3:
Use the leftover twine to tie the tag to the package. And you're done! Just don't forget your personalized message!


Wrapping Gifts Without Tape

Today is going to be a day filled with not only one but TWO unique gift wrapping ideas! You heard this right. The first is from a Japanese website that restricts the use of tape. It's crazy to think about wrapping gifts without tape because personally, I overuse tape when wrapping gifts. Think about all the tape you could save. This is quite a possibility. The video below shows this particular technique.


I had to watch this video a few times to understand how this works. It's actually pretty amazing to watch this delicate process. I can't fully explain the exact process, you just have to watch and learn. The ending is my favorite part. It was a little shocking to see how it's finished off. So try this one out. Take your time and perfect this art!

Wednesday, March 21, 2012

Andreas Amador

So remember I love everything in grand scale? Andreas Amador is a San Francisco-based landscaper and artist that takes grand scale to a new level. His work consists of geometric as well as organic drawings. His canvas, sandy beaches. That's right, he carves his drawings onto beaches using only a rake and his crew. His drawings work around the topography of the land. This creates a fluid flow that allows for more organic shapes and a more balanced look. Like anything created in sand, these only last for a short period of time. They will only be memorialized in photo.

photo via Andreas Amador

photo via Andreas Amador 
photo via Andreas Amador

photo via Andreas Amador


You already know how I feel about always having a camera handy. You never know what you will see or create. I'm also a big fan of florals, swirls, and organic lines. Creating them in such a large scale just enhances their beauty and leaves one in awe. The next time you go to the beach, try drawing stuff into the sand. You never know, you might create a masterpiece (even if it's on a smaller scale).

Tuesday, March 20, 2012

Pantone Tarts

It's the first day of Spring! Welcome warmer weather and brighter colors. To celebrate, I found some pretty creative fruit tarts designed utilizing pantone color palettes. These tarts were specifically designed by French food designer Emile de Griottes for Fricote magazine. I love everything about food art. Making food look more desirable to an audience is genius. I mean who wants to eat something that's unappealing to their eyes? Your senses all work simultaneously. If it appeals to your eyes, it will enhance all your other senses. But sometimes food can look too good to eat. That's why it's always good to have a camera around. This way, you can cherish and immortalize the image forever. Now you can have your cake (in this case tart) and eat it too!

photo via Griottes 

photo via Griottes

photo via Griottes

Monday, March 19, 2012

Frozen Yogurt Dots!

Wow it's already Monday! I can't believe how time flies. Since today is kind of a slow day for me, I'd like to share with you all this simple yet delicious dessert. When I saw this yogurt idea, I instantly wanted to make them. They were calling my name. I'm a big fan of yogurt so I always have them around. The best way to eat them is frozen, especially the whips kind. They're light and fluffy so when they freeze, they're airy and not too dense like ice cream. Today I want to show you this different approach to enjoy yogurt that's easy to make, but tasty enough to be a crowd pleaser!

These are super simple to make. Just fill a bag with your favorite yogurt, cut the tip off the bottom corner, squeeze nickel-sized dots onto a freezer friendly tray, freeze, then enjoy. So go ahead, try these out. But be warned to make extra because once anyone tries these babies out, they'll be instantly hooked, even addicted! These little dots of deliciousness will surely turn any dessert hater into a secret dessert lover.
photo via One Good Thing by Jille


Saturday, March 17, 2012

Coat Hangers

Hello there again and a Happy St. Patrick's Day! I hope you didn't forget to wear green today. I actually forgot, but still managed to get some really cool green ketchup from Burger King. It was quite an eventful day. So I've been looking at hangers today and came upon some pretty unique hangers that I haven't even seen before. I'm kind of boring with my small closet so I have ordinary white hangers. But if I had a ginormous closet, I would definitely get some of the hangers below. For now, I can only dream about them and their beauty.

Wood Hangers
photo via PapiLuc

photo via Designboom


I've always been a fan of nature and the outdoors, but I've never been the outdoorsy type. I think I just like the visual and beauty of nature rather than the actual atmosphere. For example, I love trees and the look of them. But the thought of dirt and bugs just turn me away from nature. So I've always love the concept of bringing the outdoors indoors by reusing and recycling. These hangers shown above do just that. They bring all the beauty of the outdoors into your living space without having the unwanted bugs and dirt that come with actual trees. Plus they're eco-friendly and stunning.


Chair Hangers
photo via Designboom


I believe in not wasting. I love to recycle and reuse items I no longer need into something more useful. Antonello Fusè designed a series of coat hangers called Abitudini that are created by using old backings of chairs. This concept is distinctive and impressive. Although they don't look exactly the same, there's a shared brilliance about them. They can be used together and still be considered a collection.


Paper Clip Shaped Hanger
photo via Yanko Design


Out of all these hangers, this paper clip shaped hanger has to be my favorite. They're compact and can easily fit into smaller closets. Along with being flat, clothes can hang freely on them no matter what they are as seen in the above illustration. They're a simple way to geek up your closest without going too over-the-top.

Character Wire Hanger
photo via TellOurStoryToo


So I thought this character wire hanger was pretty cool even though I wouldn't fill a whole closet full of them. I think they work better as a single piece that stands out in a closet. Every closet needs a focal piece and I think this hanger would do an amazing job at presenting your favorite piece of clothing. No matter what kind of hanger you use, make sure they represent you and your personality!

I Love Surprises!

Sorry for not posting yesterday. I wasn't feeling too well and knocked out kind of early. I think it's the weather because it's raining cats and dogs over here. Well I just wanted to share with you what I got yesterday in the mail. When I say mail, I don't mean e-mail. I mean physical package. So I went to check my mailbox and inside was a parcel. I didn't order anything so I wasn't expecting any package. To my surprise, it was from a good friend from high school in NYC. It almost brought a tear to my eye, seeing how it was a surprise gesture. It was just a surreal moment to hear from someone so far away.

They are available at MoMA Store

I was like a little kid on Christmas. I couldn't wait to get it opened. So I literally ran inside and carefully opened the package. The above photo shows what I received. They're notebooks and stencils. I felt so touched when I saw and opened every item.

Cookie Bookie Notebook  
MoMa Triangle Notebook


Being a designer, clever and creative things are always a plus. The notebooks were pretty awesome. They combined both these elements with a little whimsy. These will give me a new place to doodle and keep all my ideas safe and organized.

Hungry Animal Stencil Set


When I saw these animal stencils, I was excited. I love animals as well as doodling. The concept of these is kind of neat. It's compact so the smaller pieces won't get lost. The color palette is bright and lively, just what I needed to start my day. I'm still in awe with receiving this parcel. Even though I loved all the things I got, the best thing about this package was just hearing from my good friend from far far away.

Thursday, March 15, 2012

Fixed Label Packaging

I love gift wrapping and the endless ways gifts can be wrapped. With all the tools and accessories available in today's day and age, there are no excuses for hideous gift wrapping and packaging. The one thing I hate are the labels for packages. They are usually just pieces of paper taped or tied to the box. They tend to bend, fall off, or dangle to the point where they get annoying. Today, I want to show you how to use 2 different layers of wrapping paper to create a fixed label on any package.

Tools you will need:
White wrapping paper (or any light color)
Wrapping paper of desired graphic/pattern
Double-sided tape
Scissor
Glue gun
Circle scissor
Twine (not pictured)


STEP 1:
First, you want to cut and wrap your white wrapping paper the way you would normally with any other package. This is going to be the bottom layer, the one that's going to be the "label."

STEP2:
Next you want to take your other wrapping paper and measure the placement of where you want your label to be. Take your circle scissor and die-cut a circle in the desired area. (Doesn't have to be a circle, any shape will do)


STEP 3:
Wrap your package with this die-cut paper over the white layer, this is your outer second layer.


STEP 4:
Take the twine and wrap it around the package. Take the glue gun and glue the loose twine up to the edge of the shape without covering it. The look you want to aim for is that of a dangling tag.


STEP 5:
Write name or message to recipient in the white space and you are done!


Gift wrapping doesn't have to be something you are forced to do because you have to. Be creative and have fun. This way you will actually want to gift wrap. Try this with different colors and patterns for a unique look only you can dream up!

Wednesday, March 14, 2012

Lovely Bridal Shop in LA NOW!!!!

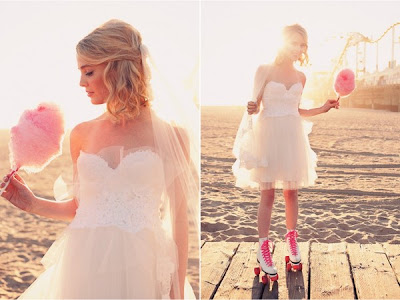
Happy Wednesday! So I'm getting old to the point where I need to start living my life, grow up and settle down. As a little girl, I always dreamed about my perfect wedding day and becoming a princess as I'm sure all little girls did. I always dreamed about my prince, but the dress was always what stood out to me the most. Dress shopping can be a difficult time for many brides, but it's easier now that Lovely is in Los Angeles! That's right, the notorious bridal shop from New York is now open in LA. With more varieties than ever, wedding dresses don't have to be the classic gown we have grown to know and love.


The classic bridal dresses are typically white. But why do they have to be? It's not set in stone that wedding dresses had to be of a certain color. Be bold and modernize the typical white wedding dress. By staying within the neutral color palette, the dress will still stand out, but not draw unwanted attention to it.

Photo via Sweet Little Photographs, available at Lovely!


Photo via Sweet Little Photographs, available at Lovely!


As well as color, another thing to think about is silhouette. The classic wedding is longer in length and flares out from the waist. With the warmer weather, nothing says LA wedding more than edgy. Why not try a shorter length for a more modern feel. This will definitely be a head-turner. Not everyone wants to be a classic bride, everyone's different. Some are more whimsical and daring than other, these dresses fit them best.

Photo via Sweet Little Photographs, available at Lovely!


If you still love the classic look, Lovely has many gorgeous white gowns from a variety of designers such as Carol Hannah, Elizabeth Dye, Ivy & Aster, and Watters. No matter what style and opinions one has, this boutique will surely have something for every bride on her special day.